All Posts By

Niko Kirby

5 Tips for Fall Gardeners

By Education, Fall Gardening

Mid–late summer is an excellent time to revisit the garden, review its successes and challenges and plan for fall – the season of renewal, regrowth and reimagining. Let’s look at some strategies that invite us to optimize the health and productivity of Colorado’s unique gardening season.

Tip #1 – Know When to Plant

  • Denver’s first frost can occur the first week in October
  • Check the maturity date (days to harvest) on the back of seed packets
  • Add the time needed for germination (usually 7 – 10 days), plus another 10 days to your time to account for slower growth with decreasing daylight hours

Planting techniques:

  • Plant slightly deeper than in spring to account for hot, dry soil, moistening soil prior to planting
  • Water consistently, in the cool of the day
  • Always water the roots and soil, not the leaves
  • Mulch planting area with straw
  • Spray with liquid kelp (1 tsp. kelp concentrate per quart of water)
  • Consider using shade cloth attached to a wooden frame for peas, lettuce & spinach

Tip #2 – Select Varieties Wisely

  • Crops either grown for a fall harvest or planted to overwinter & mature the following spring or early summer include: 
    • Seeds: leaf lettuces, spinach, arugula, mustard, radish, beets, peas, carrots, kohlrabi, green onions, cilantro (may overwinter to produce early spring crop)
    • Transplants: broccoli, cabbage, cauliflower, kale, brussels sprouts
    • Spring, early summer harvest: garlic
  • Choose the variety of seed or transplant that matures in the shortest period of time

Tip #3 – Remove Crops that are No Longer Productive

  • Any spring crops still standing in the garden (peas, radish, mustards, arugula, lettuce or spinach) should be removed, chopped up & used in the compost pile if not heavily infested with insects
  • Renew soil prior to planting & around established crops:
    • Spread around an inch of plant–based compost (such as ‘A1 EcoGro’) on vacant plot areas & around main season crops
    • Dig compost around 2” into bare areas & scratch several handfuls lightly into the soil around all remaining plants

Tip #4 – Save Space for Garlic

  • Garlic is best planted in early October
    • Either ‘hardneck’ (the kind that produces a flowering stalk called a ‘scape’) or ‘softneck’ (the kind usually found in grocery stores & used for garlic ‘braids’) can be planted
    • Carefully separate the bulb into individual cloves, using the largest cloves for planting & smaller ones for eating
    • Leave the papery skin intact & plant in compost–enriched soil, 3 – 4” deep,  4 – 5” apart in full sun
  • Mulch with several inches of loose straw or chopped leaves (run over them with a lawnmower) if planting after leaf drop
  • Water well several times over the winter if we don’t have adequate snow cover

Tip #5 – Plant Fall Cover Crops

  • Grains such as winter rye and legumes such as hairy vetch are planted, often mixed together to cover the soil like a blanket, preventing soil erosion
  • Their roots improve soil structure, opening up air channels that promote deeper rooting for subsequent crops & also provide nutrients that benefit soil microorganisms
  • They can serve as habitats & food sources for beneficial insects
  • They keep weed species in check by covering the soil surface & decreasing sunlight available for weed germination

Planting techniques:

  • Plant by mid–late September
  • Follow directions on the cover seed packet regarding amounts to plant
  • Rake seed lightly into the top ¼ – ½” of soil, lightly pressing it in with a hoe
  • Cover with a light layer of straw or chopped leaves
  • Water 

Early spring care:

  • Cut down the cover crop before it reaches knee – high, leaving the top growth on the surface as a mulch & the roots in the ground. 
  • Wait 2 weeks for decomposition to occur prior to planting spring seeds
  • Enjoy your best garden ever, knowing that you have worked to prepare fertile, moisture–retentive, biologically alive soil

How To Grow Garlic

By Education, Fall Gardening

SOIL 

Garlic likes full sun and well-drained soil. Garlic is quite tolerant when it comes to soil types and textures, but it definitely appreciates sandy-clay-loam that is friable (easily crumbled in the hand) and has a high organic content. It does best when the pH is in the 6.2 to 6.8 range. The garden or field should drain easily – standing water just won’t cut it as the bulbs could rot in the ground. To increase the tilth of the soil, add organic matter such as well-composted manure. You can also green mulch, which is planting cover crops such as clover or buckwheat and then tilling them under.

PREPARATION

If you have a small plot, spade up the top 6 to 12 inches. Garlic roots like to go deep, so well-cultivated soil is a big help. Mix in the organic matter and manure at this phase. After the deep tilling, we find a final pass with a cultivator that powders up the upper several inches of the soil aids in planting.

PLANTING FAQs

When to plant? The fall is best. Remember garlic is a bulb (like tulips and daffodils). Plant 4 to 6 weeks before significant ground freezing may occur. On the High Plains, we like to get going by mid-September, since snow by the end of September is not at all that rare here. The idea is to get the cloves in the ground during warm weather so germination occurs and good root formation follows. It is good sign when you get green shoots popping above the soil in late autumn. Don’t worry. The tips may suffer a little winter burn, but they can tolerate zero and below.

When do you “crack” the bulbs? Since one obviously does not plant the bulb whole, you must crack (split) the wrapper and separate the individual cloves. It is best not to do this more than about 48 hours before actual planting, or they will begin to dry out and lose viability.

How deep to plant? We find the tips should be about 2 inches below the soil surface. For elephant (Buffalo) garlic, make that 3 to 4 inches. Be sure to plant with the pointy side up/basal plate (root) down.

How to plant? In dry climates we find it works best to let the upper few inches dry out and then bring in the cultivator. Then you can literally just stick the cloves in the ground by hand and the soil covers them up as you remove your fingers. If you have heavier and/or wetter soil, you can poke a hole in the ground with a broom handle and just drop the cloves in the hole, covering up the entire batch with a rake at the end. This works best if you water the soil several hours before planting so it is moist but not muddy.

How close do you plant them? Our experience is that closer is better. But the cloves should have enough room to grow into large bulbs (at least 4 to 6 inches for hardneck and 6-8 inches for elephants). The close planting helps with weed control once the plants get larger in spring as the leaves block out the sun to the later sprouting weeds. If you plant in rows, be sure to leave enough room (24-30 inches) in between so you can get in there to weed next spring. 24 inches wide by 21 inches long would fit approximately 20 cloves. They would be 6 inches apart going across and the rows will be 7 inches apart.

MULCHING

This is a key element to real garlic success. Mulch serves many purposes, not the least of which is to regulate the sharp changes in temperature and moisture that can occur during winter, especially out west. But it also goes a long way towards controlling weeds the next spring. Mulch can be straw or alfalfa. Lawn grass clippings are excellent. Chopped leaves will work if you have them. Wetting down your mulch helps compact it, making it less likely to take off. You should plan to put the mulch on immediately after planting (perhaps after giving the ground a really good watering). Don’t be shy on the mulch, at least several inches should cover your crop. You would be surprised how tough those shoots are when it comes to punching through the mulch. If you do mulch extra heavily, removing some of the overburden in spring might be a good idea, but leave enough for weed control.

IRRIGATION

Most of the time it really likes moist (not soggy) soil. Watering regularly in the fall during germination is essential. In dry climates, watering in winter is also important. Keep on watering into the spring when the maximum green shoots are forming. Then about mid- to late June, or when the scapes (on hardnecks) are standing high, STOP. During the last four weeks, when the bulbs are finishing off, and the wrappers are drying out, too much water is not good. You can create a mold or fungus problem.

HARVESTING

When to harvest? When the lower third to half of the leaves have turned brown, but there are still mostly green leaves higher on the plant, it’s time to harvest. You can always test dig one or two plants. On the High Plains, depending on the weather, harvest can begin as early as the first week of July. There is also a two to three week difference in the harvest dates of the several varieties. To get the bulb out of the ground, don’t just try to pull them. The stalk will break. You must dig, using a pitchfork or the like in order to loosen the soil. Then you can lift the entire plant out of the ground.

CURING & STORAGE

If you want to store your garlic, you have to cure it first. After the curing process they store up to six months. The entire plant, leaves and all, should be dried out for about two to three weeks. The drier your climate the faster the curing will go and the less chance you will have to deal with mold. The simplest is to tie up a bunch with string/wire and hang them in a well ventilated place. Do not wash your bulbs or let them be exposed to water. You can also pack them loosely into large mesh bags or in open sided crates. But they must get a lot of air circulation. After the curing is complete, lop off the tops about an inch above the bulb and trim the roots.

Storing garlic requires an even temperature (50-70°F seems to work) and a relative humidity averaging in the 50-60% range. Make sure they get plenty of air circulation. Most hardneck garlics and elephants can be kept for several months. The softneck varieties do tend to have a somewhat longer shelf life.

Fall Cover Crops

By Education, Fall Gardening

Cover crops consist of many different types of plants, usually annual, biennial or perennial grasses or legumes, which are grown to cover the surface of the soil.  After they are tilled or dug into the soil, they are known as ‘green manures’.  

Benefits

  • Cover crops act like a blanket, preventing soil loss from wind and water erosion. 
  • Their roots hold the soil in place and help to improve soil structure. During the process of decomposition, microorganisms and the decomposing cover crops produce sticky substances that glue soil particles together.  This opens up air channels and also increases the water holding capacity of the soil.
  • Cover crops keep weed species in check by covering the soil surface and decreasing sunlight available for weed seed germination. Additionally, some grasses, such as winter rye exhibit a property know as ‘allelopathy’. Their roots, when tilled into the soil, prevent seeds from germinating until the plant has decomposed.
  • Crops in the legume family, such as hairy vetch, planted with specific types of bacterial inoculants, have the ability to develop special structures on their roots that store nitrogen and make it available as the crop is dug or tilled under.
  • Many cover crops reduce pest insect populations by serving as habitats and food sources for beneficial insects.


Crop and Planting Specifics

  • Best choices for fall planting include Winter Rye and Hairy Vetch. Often a mix of rye and vetch is planted. Austrian winter pea is slightly less hardy.
  • Plant by mid – late September as crops are harvested. Small amounts of the above varieties can be obtained from local garden centers. The mixes can also be ordered from Peaceful Valley Farm and Garden Supply: www.GrowOrganic.com       
  • Prepare seedbeds by digging thoroughly, adding an inch or so of decomposed compost mixed into the top 4 – 6 “ of soil. Make sure large clumps or clods are broken up.
  • Water the area well prior to planting the cover crop seed.
  • Follow directions on the seed package for seed sowing (Winter rye: 4 – 6 oz per 100 square feet, Hairy vetch: 2 – 3 oz per 100 square feet).
  • Rake seed lightly into the top ¼ – ½” of soil, lightly pressing it in with a hoe.
  • Cover with light layer of straw or chopped leaves 

Early Spring Care

  • Cut the rye before it reaches knee – high, then dig or till or crop remains in.
  • Wait two weeks for decomposition to occur prior to planting spring seeds
  • Enjoy your best garden ever, knowing that you have worked to prepare fertile, moisture-retentive, biologically alive soil.

Learn more about how to plant cover crops with Brit + Nessa!

Constructing a Hoop House for Season Extension

By Education, Fall Gardening

Supplies Needed

Note: This list provides everything you will need to build a hoop house large enough to cover a 4’x8’ raised bed. 

  • 4-5 – 10’ pieces of ½” PVC piping 
  • 2 – ½” PVC caps
  • 1-1/4 in. Ratcheting PVC Cutter
  • 3 – 1 ⅜” x 2 ½” U bolts or Tape
  • Hammer
  • Bricks, large stones, or weights (1-2lbs) at least 6 for each bed
  • 6-12 Spring Clamps 
    • You may not always need all 12 of these, or this specific model, but whatever you buy make sure they have rubber tips to protect against tearing the plastic and that they are strong enough to secure the sheet during high winds. 
    • Option: you can buy flexible rubber tubing to cut and secure around the pvc to prevent tearing when clamping the plastic sheeting to the frame.
  • 6-8 pieces of 24 inch rebar (# of pieces dependent on how many frame bars you use)
      • They sell this in bundles of 6 at 24” per piece. Otherwise you will have to cut them down to the desired length – the next size down in the pre-cut bundles is 12″. Some shops may cut this for you. Home Depot and Lowes will not.
  • 4-6mil plastic sheeting or light row cover (Amazon has numerous options for varying thicknesses)
  • Plastic sheeting: Anything in this range will provide the cover you need while still allowing light in. However, the thicker the plastic, the harder it can be to manage and the heavier it is, which may be a factor with heavy snow and cold temps providing sturdier protection and insulation
  • Row Cover: This product is great for shoulder season frost protection, but should not be considered safe cover for plants when temps dip over 4-5 degrees below freezing for extended time periods. For long-term season extension plastic covering is recommended. 

Directions

Step 1 – Decide on your spacing for the main frame pieces and measure/mark their placement.

For this build we will space enough for three frame bars. One on each end of the bed with a single bar spaced equal distance in the middle of the bed. Note: For a 4’x8’ bed It is recommended that you do at least three cross bars for support, this will help safeguard against collapse in the case of severe weather.

Step 2 – Hammer your rebar pieces into place where you marked for the frame.

You can place these on either the outside or inside of the bed. For this build we will place the rebar inside the bed, up against the walls of the frame. Leave at least 6 inches of rebar exposed above the surface of the soil.  Note: This will all depend on the height of your bed borders, you do not want rebar exposed far above the top of the bed. This is a serious safety hazard. You want to make sure you have enough rebar exposed to secure the frame. If you have a low-sitting bed and have no choice but to leave some rebar exposed, be sure to remove the bar whenever you remove the frame for the season to reduce the chance of injury. 

Step 3 – Lay one 10’ piece of PVC the length of the bed, mark both ends 1 inch past the inner length of the bed, and cut accordingly.

This will act as the ridge bar that runs the top length of the cross bars. It will work as the main support beam for the main frame. 

Step 4 – Cut your cross bars to a length of your choosing.

For a 4’x8’ bed, it is recommended that you cut them no less than 6’ and no more than 8’. Less than 6’ and you limit your space, while more than 8’ can cause the frame to become less stable and more vulnerable to wind. 6-7’ is the sweet spot.

Note: The length of the cross bars will vary greatly depending on the size of your bed. 6-7’ may be too large for a smaller bed, say 3’x6’. Knowing what you’ll be planting and the size of your bed will help you make the proper height adjustments. If you are unsure and not interested in math equations, take the pvc pipe and attach it to one side of the rebar. Hold it in place, bend it over the bed, and measure how high you want it. Be sure to apply this same measurement to all cross bars. 

Step 5 – Place the PVC caps on both ends of your ridge bar to protect the plastic from tearing against the frame. 

Step 6 – Run the ridge bar the length of the bed and attach it to the underside of each crossbar with the U bolts.

The open U side should be facing down towards the soil, with the smooth U bend on top of the PVC. If you do not have the bolts or do not want to use them, you can use a variety of tapes, or other fasteners. 

Step 7 – Measure and cut your plastic sheeting.

Measure the length of your cross bars (in this case – 6’) and the length of your bed (in this case 8’). Use these two measurements to cut the width and length of your sheet. Be sure to add enough to both measurements to account for the height of the bed itself. If the walls of your bed are 6” above ground, add 8” to both the width and the length. You want to ensure that you have enough extra sheet extending to the ground with a bit extra to spare. The extra plastic will allow you to use weights to secure the sheet on the ground around the edge of the bed. 

Note: If you really want to ensure you’re cutting perfectly, you can take the frame pieces and lay them out on top of the plastic, just as they were spaced in the bed, then cut, again, being sure to account for the extra you’ll need to cover the bed frame.  

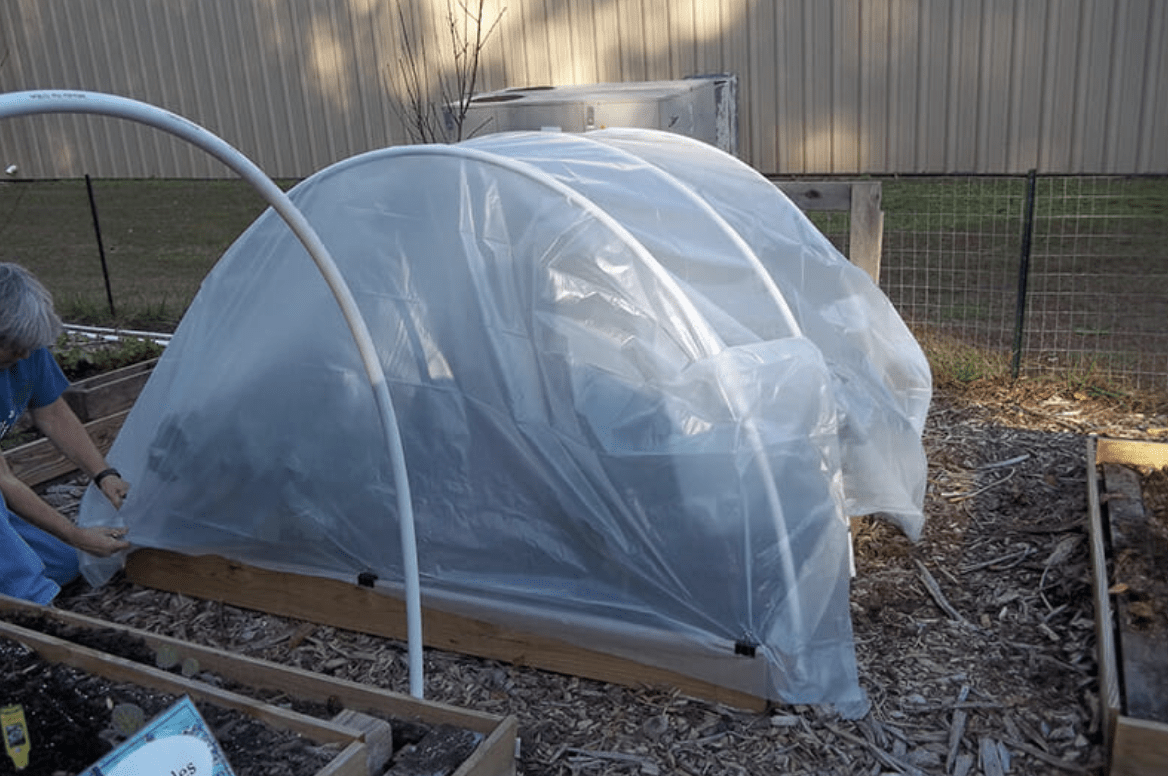
Step 8 – Place the sheet covering over the frame and even it out on all sides.

Use your clamps to secure the plastic to each crossbar. Attach the clamps to the crossbars down near where they intersect with the bed frame to create a partial seal around the edge of the bed. Use your weights, bricks, or other heavy items to secure the extra sheet around the base of the bed, especially in the front and back where you will enter and where the plastic covering is most vulnerable. 

Note: You may need to add more clamps to the frame as the weather dictates. Colorado is becoming an increasingly windy environment and wind is a hoop house’s arch nemesis. 

6 Things to Consider When Turning a Lawn Into a Garden

By Boundless Landscapes

I’ve made every gardening mistake in the books so you don’t have to!

By Jennifer “Fern” Deininger, Farmer & Gardener

When walking around the Front Range you may have noticed a significant number of homeowners transitioning their front yards into xeriscapes, vegetable gardens, perennial habitats, or pollinator gardens. There is an increasing number of first-time gardeners in the United States, and with that many homeowners have begun to replace parts of their yard with more environmentally- and socially-beneficial landscapes.

In fact, based on research from Bonnie Plants, more than 20 million Americans planted a vegetable garden for the first time during the COVID-19 pandemic.

For years I’ve worked with homeowners to turn their lawns into gardens and food-producing micro-farms, so below I’ve shared six things to consider before taking the leap.

1. Consider how light and water move across your landscape. Food-producing gardens often need 6+ hours of sunlight per day. When picking a spot to install a raised bed or plant your in-ground garden, look up. Try picking a spot that won’t be obstructed by large trees or shade from a house. If you’re doing this in the winter, keep in mind that your trees will likely cast even more shade once they grow their leaves in the spring. You’ll also want to consider how water moves across your landscape. I recommend picking a relatively level spot if you’re creating an in-ground bed or taking the time to carefully level your raised beds if you’re building a raised-bed garden. It makes a huge difference! If you’re planting in-ground, selecting a location where water doesn’t flow too quickly across your garden area in a rain storm will help slow erosion and prevent run-off from any fertilizers you use. Similarly, if you can avoid planting in the lowest spot on your property, then your garden will be less likely to flood in a rainstorm. 

2. Pick no more than one big landscaping project each year to make your installation more manageable. It can sound really enticing to go from lawn straight into having a beautifully planned garden with lush raised beds, trellises, mulched walkways, and mature perennial plants, but all of these things take time, money, and resources. I recommend homeowners start with one big project per year, whether that is removing the lawn, installing a few beds, or purchasing and planting ground cover. Perennial plants can be expensive and take a few years to establish, but purchasing a few every year will prevent overcrowding and is easier on your wallet! I recommend starting with projects that address the layout and infrastructure of your garden. This may include building raised beds, installing irrigation, removing your lawn, etc. 

3. Plan for visitors! I always try to plan for what sorts of beings may be visiting the garden. Whether it’s children, dogs, deer, aphids, bunnies, or squirrels, knowing in advance who is likely to visit your garden can help you select the right plants and the right protection. If children will be around, stay away from any perennials that may be toxic like sweet peas or foxglove. If you have deer that come around, try planting a border of deer-resistant plants like lavender, columbine, and larkspur. If you have a dog that loves to dig, then you may want to consider a tall raised bed rather than an in-ground garden. If you’ve noticed you have a large number of pests like Japanese beetles or aphids, planting insectaries (plants that attract beneficial insects) like cilantro, dill, cosmos, coreopsis, and yarrow is helpful!

4. Have a plan for irrigation before you dive in! Many perennial plants need frequent irrigation for at least the first few years in a garden and annual vegetables may require irrigation every day or every other day depending on many factors. Irrigation can seem daunting, but there are many great ways to water your garden (aside from lugging a watering can or hose around). Whether you tap into an existing irrigation system at your home, install a whole new one, or add a timer to a spigot and run your irrigation from there, I recommend reaching out to a professional who can help with the design and the installation. Irrigation mistakes can be costly and can cause damage and flooding in your home, so make sure to speak with a pro before diving in. 

5. Protect the soil! Healthy soil is the foundation of any garden. When removing your lawn, try to avoid compacting the soil or letting it sit bare in the hot summer sun. Soil needs air, water, and nutrients to be happy. Whether you’ll be planting in-ground or in a raised bed, I recommend aerating the soil and adding two inches of high-quality compost in the spring and fall. If you’re looking for a soil-friendly way to replace your lawn with a garden, feel free to check out our other blog post about sheet mulching! *Link to sheet mulching

6. Call before you dig! Call 811 a few business days before any projects that involve digging. Whether you’re planting a young tree or installing a fence, call 811 to make sure your underground utilities are flagged appropriately. 

I hope these tips help you make smart and budget-friendly decisions when considering turning your lawn into a garden. If you have any questions about taking this step, we offer garden-coaching sessions at Boundless Landscapes to help empower homeowners to get outside and try something new. We’d love to support you!

Welcome To Our New Board Members

By News, posts

We are thrilled to announce three new members to the DUG Board of Directors. Tim Craft, founder of Craft Companies, Jesse Ogas, Executive Director of Social Responsibility and Corporate Engagement at 9News, and Chris Shaffner, Senior Vice President at CoBank have joined the DUG Board for a two-year term beginning July 2022.

Meet Tim Craft

Tim is the founder of Craft Companies, a Denver-based real estate development firm that is transforming the future of home building through responsible, sustainable, and innovative practices that set a higher standard for future development. This is achieved by creating clustered developments, preserving open space and starry skies, incorporating pocket parks, solar lights and energy saving practices.

Recognized for national design excellence, Tim and his team are currently working with five local counties and municipalities to deliver communities that maximize natural resources through responsible land planning, preservation of open space and green technology.

An active partner in the communities where they create neighborhoods, Craft Companies’ hosted the HBA’s 2021 Parade of Homes Industry Night at their conservation-focused Independence Community.

Meet Jesse Ogas

Prior to joining the non-profit sector in 2006, Jesse worked in the retail industry where he worked on Regional teams and as a GM leading several big box stores in Colorado and Utah. After a 17-year career as a GM, he decided to take his knowledge to help the non-profit industry to think about philanthropy differently. Under Ogas’ 9 yr leadership, Firefly Autism has grown to serve families and children with autism across Colorado and is considered one the leading agencies in the field of Applied Behavior Analysis (ABA) Therapy nationally and internationally.

Ogas is a proud member of one of the nation’s prominent Latino Theater companies, Su Teatro. He is a community advocate that has served on a variety of nonprofit Boards, including Colorado Aids Project, Tepeyac Community Health Center, Kemp Foundation, Latina Safehouse, Newsed Development Corporation, Adams Camp, Latina Safehouse, and the MSU President’s Cabinet. Currently, he serves on Tepeyac Community Health, Firefly Autism, Newsed, and 365 Health. He is a recipient of the Eric J. Duran Community Service Award, which honors a person of Latino descent who has made a positive impact in the Denver community.

Ogas was the 2021 9NEWS Leader of the Year, which is presented by the Denver Metro Chamber Leadership Foundation. Ogas also recently participated in 9NEWS’ Voices of Change initiative during Hispanic Heritage month. Voices of Change is an ongoing conversation that amplifies voices of community members who are provoking change toward building an equitable, inclusive, and flourishing Colorado.

Today Ogas leads the DEI efforts with 9News as the Executive Director of Social Responsibility and Community Engagement. He just successfully relaunched the 9Listens Community Voices event, is working on the relaunch of 9Who Care, and rebuilding alliances in all the communities in which 9News serves.

Meet Chris Shaffner

Chris is the senior vice president and director of business operations for CoBank, a cooperative bank that provides loans, leases, export financing and other financial services to agribusinesses and rural power, water and communications providers in all 50 states.

Chris responsible for the development and execution of bank-wide strategic initiatives impacting loan and investment portfolios, including legislative and regulatory issues, portfolio growth, and customer initiatives. He also leads CoBank’s $3 billion water infrastructure finance business. In 2020, Chris also served on President Biden’s Infrastructure Policy Committee, co-chairing both water and rural subcommittees.
Prior to joining CoBank in 2015, Chris held various leadership positions in both public and private organizations, including private equity funds management in excess of $1 billion. He also headed borough operations for the New York City Housing Authority, where he led a team of 1,500 responsible for operating Manhattan’s 60,000 public housing units.

Mr. Shaffner earned a bachelor’s degree from Indiana University, a juris doctor degree from Valparaiso University School of Law, and an MBA from the University of Michigan’s Ross School of Business. He lives in Denver with his wife and two kids and also serves on the Board of Directors of Colorado Youth for a Change.

As we welcome our new board members, we also say goodbye to three long-standing DUG board members, Diana Denwood, Chloe Mickel, and Ramonna Robinson, who collectively have served DUG for the last 10 years. We are so grateful for the extensive time and effort they have each offered to DUG over the years, and wish them the best in their future endeavors.

We’re kicking off our Listening Tour 2.0!

By News

In the summer of 2020, DUG held our first Listening Tour to engage a variety of stakeholders including gardeners, program participants, garden leaders, workshop attendees, board members, educators and the broader community.

After connecting with hundreds of people through surveys and interviews, we partnered with CSU graduate students to identify critical feedback that vital in reorienting DUG’s Vision Mission and Values in 2021. Information from the Listening Tour also shaped new initiatives and programs such as the Baseline Infrastructure Initiative, DUG Corps, Micro Network events, and more robust leadership for Garden Leaders, among others.  

To build on the positive momentum of our first Listening Tour, this summer we’re launching our ‘Listening Tour 2.0‘ across 6 DUG Gardens, specifically targeting groups we may have missed the first time, including educators (who were BUSY during the pandemic!), folks with a first language other than English, and those who may have had difficulty participating in an online survey due to technical barriers.

DUG is proud to be a community-led organization; constant feedback loops are necessary in all our systems and processes. In order to help us build capacity amongst staff to engage in this work, DUG has partnered with Centrality Research, a team specializing in bringing a community-driven voice to organizational decision-making. In May of this year, DUG staff and DUG Corps participated in an Engaging Community Through Conversation training led by Centrality Research in order to continue to develop our team’s community engagement skills as they relate to gathering, using, synthesizing, and implementing community feedback.

We want to dream alongside our communities about all the ways our organization can be a catalyst for community connection, relationship-building, and the shared vision of gardens as spaces of belonging. 

One of our goals for this Listening Tour is to reduce barriers to participating in feedback sharing. Our six listening sessions will provide food, tandem children’s activities, interpretation (as needed), and each participant will receive a $25 gift card to King Sooper for participation. 

We appreciate you being along for the journey as DUG continues to live our values of earning trust, demonstrating integrity, embracing equity, building community and inspiring curiosity. We are listening. And we can’t wait to hear from you. We look forward to sharing the findings of our Listening Tour 2.0 later this year. 

Welcome DUG’s 1st Advisory Council | National Thought Leadership

By News

Denver Urban Gardens has spent several decades building a robust network of community gardens across metro Denver.  We are thrilled to announce the DUG Advisory Council, composed of nationally and globally recognized experts!

Advisory Council members provide guidance and thought partnership to DUG senior leadership and lift up our work through their networks. We also ask them from time to time to engage in educational opportunities and fundraising events.

Thank you to our 1st Advisory Council Members:

Dana Bryson | Senior Vice President, Social Impact at Study.com

X

Zach Bush, MD | Physician, Research Scientist, Entrepreneur and internationally recognized educator and thought leader

X

Steve Culbertson | President & CEO at Youth Service America

X

Robert Egger | Nonprofit/Power Of Food Advocate & Dedicated Elder Ally

X

Ryland Englehart | Co-Founder + Executive Director at Kiss The Ground

X

Beverly Grant | Founder, Mo’ Betta Green MarketPlace

X

Daniela Ibarra-Howell | CEO and Co-Founder, Savory Institute

X

Jeff Krasno | Co-Founder, CEO + Podcast Host at Commune; Co-Founder + Executive Chairman at Wanderlust; Author; Conscious Capitalist

X

Roxanne Moore | Executive Director, Sodexo Stop Hunger Foundation

X

Robert Reiman | CEO for the Giving Grove

As the organization evolves, we have identified six pillars of our work that go far beyond gardening:

Climate Change
Community
Health & Wellness
Skill Building
Food Access & Sovereignty
Foodways

As we go deeper on these high-impact topics, we seek to both share our voice and hear from voices working in these critical areas beyond our hometown.

We Can’t Wait to See You at Gather ‘Round 2022

By News

Gather ‘Round, Denver Urban Gardens (DUG)’s annual gala, is a celebration of our gardens’ bounty as we welcome the harvest season, and has been a community tradition for over a decade.

This year’s event will be co-hosted by Denver food legends Pete Turner, Dana Rodriguez, and Brad Reubendal. For the first time EVER, we’ll be recognizing and uplifting the work of local and national changemakers with our DUG Impact Awards.

Join us as we celebrate the cross-sector work of individuals, government organizations, NGOs, and coalitions working alongside DUG as we pursue our vision of a sustainable urban future where people are deeply and directly connected to the earth, each other, and the food they eat.

Impact Award Winners:

Ancestral Foodways – Spirit of the Sun
Climate Action – HDR
Community Building – Denver Parks and Recreation
Food Access + Sovereignty – Denver Community Food Access Coalition
Health + Wellness – Zach Bush, MD
Skill Building + Education – Chris Woodburn, Denver Public Schools

Join us on September 8 at Upper Larimer Events in RiNo!

YOU’LL ENJOY
Luxurious seasonal plant-based fare from supper club superstars,
The Easy Vegan
+
Live music from Americana/Colorado roots band,
David Lawrence & the Spoonful

+

craft cocktails, exclusive silent auction items, a wine wall, and lots of community fun!

Grab your tickets now

Sheet Mulching to Remove your Lawn: Why, When, and How

By Boundless Landscapes

I’ve made every gardening mistake in the books so you don’t have to!

By Jennifer “Fern” Deininger, Farmer & Gardener

Sheet mulching, also known as lasagna gardening, is an environmentally regenerative, relatively easy, and financially accessible way to turn a lawn into a garden. Sheet mulching doesn’t involve the use of machinery or tilling, but rather is a method of layering materials in your garden that compost in place (or “cook down”) over time to produce a rich, fluffy topsoil that is perfect for planting vegetables, flowers, and herbs.

Sheet mulching can be used to fill a shallow raised bed, replace a patch of lawn with healthy soil for an in-ground garden, or kill weeds around perennial plants.

After the initial work of sourcing and laying out the ingredients, the sheet mulch breaks down over a period of a few months. (The sheet mulched area will need a few months to decompose before planting it up.) Rather than having a patch of your garden covered in compost, grass clippings, and leaves over the peak growing season, I recommend starting this process in the fall and letting it decompose over the winter. Before we talk about how to do it, it’s best if we cover a bit of compost 101.

Composting is a process in which organic materials are broken down by microorganisms in the presence of air (oxygen) and water. Given enough air, water, and microorganisms, the organic materials turn into a rich mixture of nutrients and good bacteria. Compost holds water much more efficiently than regular soil or bagged gardening soils and sinks carbon into the landscape. Compost requires browns (carbon-rich items like black and white newspaper, dried leaves, sawdust, and straw) and greens (nitrogen-rich items like green grass clippings, pruned parts of your vegetable plants, uncooked vegetable scraps like the tops of a carrot, and coffee grounds) with at least three times as many browns as greens.

When sheet mulching, we layer “greens” and “browns” that then decompose and compost in place over time. If you were to cut into your freshly laid down sheet mulch, it would look like a lasagna or layer cake, but over time it turns into a fully integrated mixture of compost that is perfect for planting. It’s important to note that the sheet mulch will also shrink down over time, meaning if you start with eight inches of material, it will decompose into a few inches of soil over time.

Once you’ve decided where you want to sheet mulch, it’s time to layer!

Layer 1: Start with a layer or two of brown cardboard. This cardboard will suppress weeds and grass, retain moisture to aid in the composting, and is a great snack for our beloved friends, the earthworms! Watering the cardboard will help it stay down if you’re working on a windy day and will help it decompose faster. It is important to remove all staples and non-compostable tape from the brown cardboard prior to use. The cardboard you use should be brown, rather than dyed.

Layer 2: Add half an inch to an inch of greens. Grass clippings are readily available and work well. It’s best to use grass clippings free of pesticides and pet waste, so source carefully.

Layer 3: Three inches of browns, such as straw, fine wood chips, and black and white newspaper shreds. Just make sure you don’t use hay, which often has seeds in it!

Layer 4: Repeat with greens and browns until you’ve reached the desired depth.

Top Layer: The top layer should be a mixture of topsoil, compost, and mulch. 

Make sure to water your sheet mulch heavily and leave it to decompose! Topsoil and compost are readily available at landscaping supply centers and local nurseries. If you plan to do a large area, consider using a garden calculator to figure out how many cubic yards of material you will need. 

In an arid climate like Colorado where topsoil can take a long time to form in nature, sheet mulching is a great way for homeowners and gardeners to maximize their positive impact on their ecosystem.

It can take 100-1,000 years for one inch of topsoil to form in nature, but by sheet mulching, we can help speed up that process to a few months. Due to the dry nature of our ecosystem, sheet mulching works well when done in the fall so it has ample snow and moisture over the winter as it cooks down. Come early summer, your garden will have shrunk down in size, composted in place, and it will be ready for whatever is next!

Note: Do not add any meat, dairy, oil, eggs, or manure to the garden beds.

You can book One-on-One coaching sessions at www.boundlesslandscapes.com/learn where $5 from every session will be donated to DUG. Happy growing!