
Growing your own potatoes is an affordable way to reduce grocery costs while enjoying nutritious, high-fiber food. They’re a versatile crop that can be used in a variety of ways, making them a great addition to your backyard or balcony garden.
Our Favorite Varieties:
German Butterball
- Maturation Time: (85-115 Days)
- Best uses: Roasting, mashing, baking, frying, and soups
German Butterball is an heirloom favorite known for its exceptional flavor and versatility. These round to oblong potatoes have a flaky yet moist texture that shines in everything from mashed potatoes to crispy roasts. A top performer in taste tests, they also store well and yield heavily in the garden.

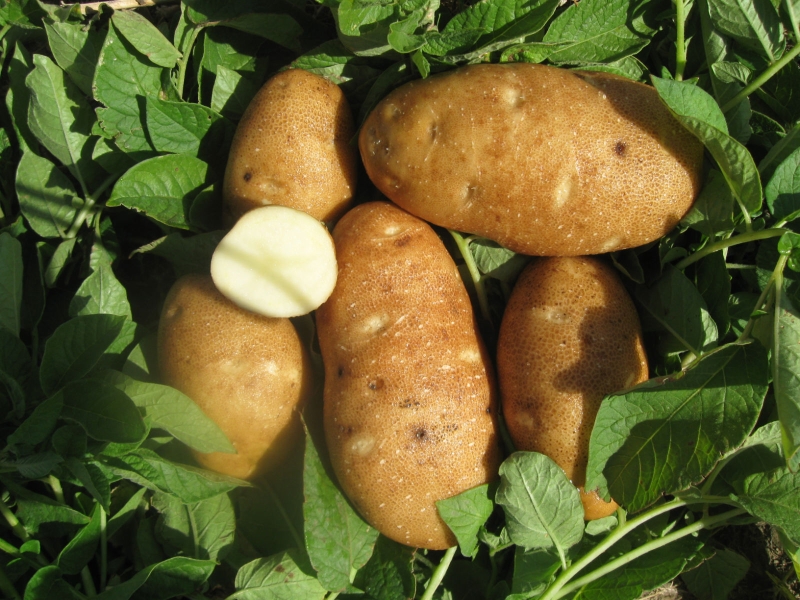
Russet Potatoes
- Maturation Time: 85-115 days
- Best uses: Baking, mashing, frying (French fries, hash browns), roasting
Their high starch content and low moisture yield a light, fluffy interior when baked or mashed, and a crisp exterior when fried. These characteristics make them ideal for classic dishes such as baked potatoes, French fries, and creamy mashed potatoes. However, due to their tendency to break down when cooked, they are less suitable for recipes requiring the potatoes to hold their shape, like potato salads.
Yukon Gold
- Maturation Time: 65-75 days
- Best uses: Roasting, mashing, boiling, baking, sautéing
Yukon Golds are prized for their versatility in the kitchen. Their medium starch and moisture content make them suitable for a wide range of cooking methods, while their naturally buttery flavor and creamy texture allow them to shine in dishes with minimal seasoning. They store best in a cool, dark place with good ventilation. Due to their higher sugar content, they have a shorter storage life compared to russet potatoes.

Getting Started with Seed Potatoes:
The first step to success is choosing the right seed potatoes. These are not the same as grocery store potatoes, which are often treated to prevent sprouting. Certified seed potatoes are disease-free and bred specifically for planting.
Choosing Your Location:
Potatoes grow best in loose, well-draining soil that’s rich in organic matter. Choose a sunny spot where the plants will get at least six to eight hours of sunlight each day. When planting, think ahead. Crop rotation is key to avoiding disease—don’t plant potatoes (or other nightshades like tomatoes) in the same spot year after year.
Preparing Soil and Planting:
Potatoes grow best in loose, well-draining soil that’s rich in organic matter. Choose a sunny spot where the plants will get at least six to eight hours of sunlight each day.
Before planting, you can cut larger seed potatoes into chunks, making sure each piece has at least one or two “eyes.” Let the cut pieces sit for a day or two to allow the surfaces to callous over—this helps prevent rot once they’re planted.
Dig a hole or trench about three to four inches deep and mix in a handful of compost. Plant each seed potato piece roughly a foot apart. If planting in rows, space them about two to three feet apart.
After planting, water in your new seed potato pieces slowly and deeply. Cover your hole with a thick bed of mulch like straw, which will help retain moisture, suppress weeds, and prevent sunlight from reaching your tubers. Keep the soil consistently moist, but avoid overwatering and creating soggy soil, especially once the plants begin to flower—this is when the tubers are forming underground.
The Importance of Hilling:
One of the most important care tasks when growing potatoes is “hilling.” As the plants grow and reach about six inches tall, mound soil or compost around the base of each plant to cover the lower stems. Continue to hill every couple of weeks throughout the growing season. This not only prevents sunlight from reaching developing potatoes—which turns them green and toxic—but also encourages the plant to produce more tubers along its buried stems.


Dealing with Pests and Problems:
Potatoes are generally easy to grow, but you may encounter some common issues. Crop rotation is key to avoiding disease—don’t plant potatoes (or other nightshades like tomatoes) in the same spot year after year. Keep an eye out for Colorado potato beetles, which can be hand-picked or treated with organic options like neem oil. Proper spacing, hilling, and avoiding overwatering will also help prevent fungal diseases like blight and rot.
Harvesting and Storing Your Crop:
You can begin harvesting small “new potatoes” once the plants flower, but for full-size potatoes, wait until the foliage begins to yellow and die back. At that point, stop watering and allow the skins to toughen up underground for a couple of weeks. Then, gently dig up your harvest with a garden fork or hands, being careful not to pierce the tubers.
After harvesting, lay the potatoes out in a cool, shaded area to cure for one to two weeks. This helps extend storage life by drying the skin and healing any minor wounds. Store them in a dark, cool (but not freezing) location with good airflow—ideally between 40–50°F. Avoid refrigeration, which can convert the starches into sugar and affect the flavor.